![]()
PRINTING
There are too many variations of reports in Estimator VJ to detail each one. It is advised to try each one to familiarize yourself.
There is one report however which should ALWAYS BE RUN before committing costs. This report is an Estimate Summary-Detailed-Include Markups and Distributions.
The three columns to check the total for are:
COST Should match the Project Cost on-screenIf they are incorrect, then the Estimate should be checked for accuracies.
ASSIGNED Should be zero
O/HEADS Should be zero
Here is an Example printout:

A Company or personal logo can be automatically printed on all reports if desired. The logo will appear at top/centre of all reports. The Logo is not scaled, so it is up to you the user to make sure that the image chosen to be used as the Logo is of desired size.
Initially there is no logo by default, so you will need to point the program to a file that contains the desired graphics. The file must contain a graphics in the format of 'PNG', 'GIF', 'JPG', or 'JPEG'. These files will have one of these format types as the extension to the file name e.g. 'logo.png'.
To choose the logo you want to use:
-
Open any Project
-
Click the Print option
-
in the subsequent 'Print Options' dialog, click the button 'Select My Company Logo'
-
in the File Chooser dialog, navigate to the desired graphics file
-
select the file by clicking on it
-
click 'Open'
The program will then copy this file into a file called 'MyLogo' in the Programs folder, and then display it in the 'Print Options' dialog next to the 'Select My Company Logo' button.
You are now done.
EstimatorVJ will faithfully print out your data, even blank lines, so if you have a lot of blank lines sitting at the bottom of a Worksheet, these will be printed out, and if there are enough of them, creating seamingly blank pages in your printouts.
The same happens with the List of Section Names. If you enter blank lines at the bottom of this worksheet, they will be printed out faithfully in your Summary Sheets.
Remedy this situation by ranging these lines in the
appropriate worksheet and press 'CTRL+DEL' key combination.
Printing Estimate Sections without Blank Lines between Items
Excluding blank lines between items is possible when printing Estimate Sections.
This is achieved by:
- clicking the 'MORE' button on the Project Window
- turning ON the option 'Exclude Printed Blank Lines'

- printing
The setting for the option 'Exclude Printed Blank Lines' will be saved with this Project and this Project only.
There are situations where the Account Name should be hidden or changed on reports. One situation may be generating an Estimate for another Company.
EstimatorVJ allows you to administer the Account Name on reports within the Project->MORE options. Here you can choose to exclude this on reports, or change the name (by default this initializes as your Account name).
NOTE: Only Account Administrators can change these settings, and these settings are Project relative.
Below shows you where these settings are located:

PRINTING REPORTS TO A TEXT FILE
Generally
Any report produced by the Projects->Print option can be written into a text file for importing into external applications such as a spreadsheet.
These files are given a name by you at the print stage and
are stored by default in the 'PrintCSVFiles' folder within the Project
folder
e.g '........./Estdata8/My
Project.Dir/PrintFiles/myPrintfileName.txt'
The format of the data in these files are strictly 'CSV' (Comma Separated Value), the most STANDARD form a data format recognised by almost all software applications. Depending upon the Application opening these files, some initial parsing setup may be required within the Application. Excel, for example, will guide you through this parsing sequence. Other Applications will have their own methods of setup.
Creating
-
Click the Projects->Print option to start the report printing process.
-
Choose the desired options
-
Click the 'Print to File' button at bottom left of dialog
-
Click the 'Print File Name' button and give it a meaningful name
NOTE: End the file name with '.txt' as this will make it easier to import into the external Application -
Click Print or Print Preview button
-
The Report will be prepared and then written to the file that you named in 4.
-
A message confirming completion will appear
-
Done
Using
This file can now be moved or copied as appropriate, or simply opened by the external application.
There will possibly be some edting required once it is imported, since all the headings for each page are included in the file, and each page has it's own column totals at the bottom.
CREATING NEW PAGES (PAGE BREAK)
If you want to start a new page in a General Estimate Section or Traditional Bill printout, then this is done by:
- Entering the word 'newpage' in the 'Description' column
- Entering the control character '*' in the 'Unit' column
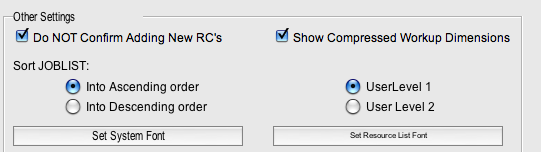
Certain reports have the option of 'Show Dimensions' available. This option then will include in the report each dimension line used in your Quantity Workup Sheet to calculate the total quantity of this item.
Each dimension line is shown in the report in the 'Description' column and can be either in compressed format or non-compressed. The Compressed or NOT Compressed setting is contained in the System->Preferences as shown here:
Compressed format means that the dimension line will appear much like you enter it into the worksheet:

Here is the printout in the report with the option 'Show Dimensions' ON, and the System->Preferences->Show Compressed Workup Dimensions ON:

Here is the same report with the option 'Show Dimensions' ON, and the System->Preferences->Show Compressed Workup Dimensions OFF:

Essentially, when the Compressed format is OFF, the dimension is shown in 'formula' mode with the column values in the worksheet substituted into the formula placeholders.
Maximum Collection Level
This is an option contained in the Project Details panel, illustrated thus:

It specifies to the Program to what level in the Project it may find reassignment, overhead, or markup flags. The default value is 3.
The higher this number, the more work the program has to do to collect these details before being able to print.
If all of these flags are specified at the Section Level, then suffice to make this '1'. If at the first Cost or Rate workup sheet level, then make it '2', and so on.
This is a project setting and is saved with the Project Details.
![]()