WORKING WITH PROJECTS


CREATING A NEW PROJECT

Projects are created in EstimatorVJ by copying an existing project, OR duplicating an existing Project Template.

Creating by Copying an Existing Project

 Simply open the Project you want to copy, then choose the Project->Copy option.

Give it a unique JOBCODE when requested - keep the jobcode short and unique.


The Project gets created and opened. Now enter the Project Details unique for this project.

Creating by Duplicating an Existing Project Template

Click the New option in the Project TAB and the following dialog appears:


Templates

Templates mentioned above are simply a Project that has specially structured worksheets with or without data, and which are Saved as a Template

EDITING THE SECTION NAMES

The Project Window as you can see, contains the Project Details as well as the Project Section Names worksheet.

The Section Names worksheet is unique to all other Worksheets in VJ in that when you edit the Section Names, the worksheet does not open up in it's own window, rather turns the current 'table' of names into edit mode signified by a grid of horizontal and vertical lines.

THE MAXIMUM NUMBER OF SECTIONS IS 498. If you exceed this number during editing, the next time you OPEN this Project, the Section Names list will be truncated back below the maximum.

When you are finished, exit the editing session by either clicking the 'Edit->Section Names' option or pressing the 'ESC' key. The grid lines in this table will then disappear, signifying that the table is now not editable.

Take note that you can only select a section to open up for editing while the grid lines are not visible.

RESTORING A PROJECT THAT WAS PREVIOUSLY BACKED UP

Restoring is the inverse of Backing Up;it simply retrieves the Project from a previous Backup file.

When you choose this option, you are presented with the 'File Open' operating system navigation dialog.Find and Open the desired backup file;it either has a '.backup' or '.estzip' file extension to it. It is this extension name that directs the program to restore the data from the appropriate file format, and place the expanded data into a Project Folder in the 'Current Projects Working Folder' (..../Estdata8).

If the project already exists, you will be alerted of this fact and given the opportunity to Proceed or Cancel the operation.

If the Restore is successfully carried out and the Restore is from a Compressed Backup ('.backup' file type), the project will then be automatically opened for you ready to work on. If the Restore is from a Zipped Backup (;.estzip' file type) , you will need to click the Open Project button to start working on it.

RESTORING A PROJECT THAT HAS BEEN DELETED

When projects are deleted, they are first copied to a folder '<ProjectsFolder>/Deleted Projects'. Therefore, if you need to restore this project to EstimatorVJ, you need to manually Move or Copy the Project's folder from the 'Deleted Projects' folder to the '<ProjectsFolder'.

You can find out where the 'ProjectsFolder' is by clicking on the button 'Chg Loc' in the System tab.

SEARCHING/REPLACE

Searching

If you want to find out where in the project you have used a particular resource or text phrase:


  • this shows an expanded 'tree list' of the items found in the project. Each entry found is listed with the 'path through each worksheet' necessary to locate the entry. 
  • CTRL+click on any entry, and the program will open up all worksheets and sub-sheets necessary to locate the entry. Furthermore, in each worksheet and sub-sheet, the program will locate the entry for you
Search and Replace

If you want to find out where in the project you have used a particular resource or text phrase, and then replace it with another resource code or text phrase, carry out the SEARCH as described above, and then when the 'Location List' (as shown above) appears, do the following:

  • Replacing Resource Codes
    • Enter the replacement Resource Code in the text field at the bottom and click 'Replace' (your entry will automatically be converted to Uppercase if it is not already)
    • Click 'Yes' to confirm the replacement or 'No' to abort
    • Click 'Yes' if you want to replace the Resource Code in your Resource Library as well, or 'No' to skip that step
    • A Message will then come up confirming that they have been replaced
NOTE: When replacing Resource Codes, you cannot select which entries you want changed - all entries will always be replaced regardless of which entries you select

  • Replacing Text Phrases
    • Enter the replacement Text (case dependent) in the text field at the bottom and click 'Replace'
    • Select which entries you want to be replaced
      • make no selection and ALL entries will be replaced
      • click on an entry, and ALL entries at that level and down will be replaced
      • click on an entry and then SHFT+click on another entry to select ALL entries between them, and ALL selected entries at that level and down will be replaced
      • CTRL+click on non-contiguous entries, and ALL selected entries at that level and down will be replaced
    • Click 'Yes' to confirm the replacement or 'No' to abort
    • A Message will then come up confirming that they have been replaced
     

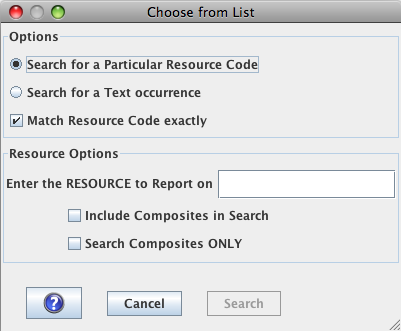
FINDING/DISPLAYING UNCOMPLETED ITEMS IN AN ESTIMATE

This can be accomplished in one of two ways.


OPTION 1:

This is the preferred option and revolves around the following worksheets containing a column headed as 'Completed':

Section Names (mandatory)

Estimate Section Worksheets (mandatory)

All other Worksheets (not supported)

Furthermore, there needs to be the formula "@COMPLETED()" in and only in the Section Names worksheet.

Initially ALL cost items and sections are marked as incomplete (the absence of a (tick) in the 'Completed' column).

Each time the user completes costing of an item in the estimate, the user simply clicks in the 'Completed' column on the same row as the item and a '' will appear - conversely if the tick is already in the cell then the tick will be removed.

A will appear in the Section Names worksheet against any Section where all the cost items in that Section have been marked as completed.

The following column characteristics are required for the 'Completed' column to function correctly:


OPTION 2:


It is a convenience in many cases to be able to 'mark' items as 'uncompleted'. The typical scenario is when you have started pricing an item and am unable to complete this due to waiting on some additional information to be supplied. Here you will leave this item and then move onto another item to commence pricing.

Later on, when the information becomes available, you will then revisit the item and complete the pricing.

However, you may end up with many items uncompleted, and not remember which ones and where.

This process is divided up into three steps - mark, find, unmark - each is described below.

Marking Uncompleted Items

All worksheets by default contain a 'F' column (Flag column) which is normally used with the flag '0' (zero) for 'omitting' items which have been priced in detail but are no longer required.

However, the 'F' column can have any entry you wish in there, so we suggest using the 'U' flag for UNCOMPLETED.

Consequently, if you start pricing an item, and need to leave it and move onto another, place the 'U' in the flag column next to this item.

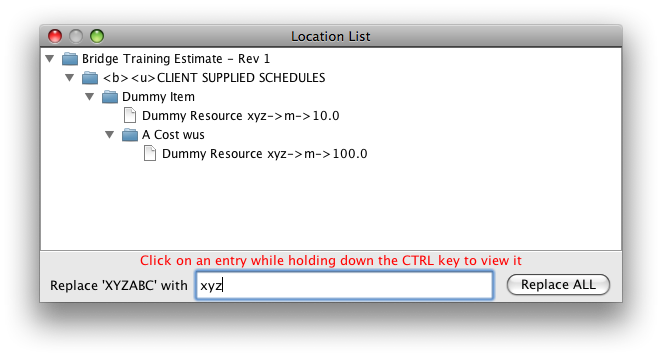
Finding Uncompleted Items

When you need to find an uncompleted item or items, follow these steps:

    1. Click the Projects->Search button
    2. Turn ON the search for text option
    3. Turn on the 'In Column' option
    4. Enter 'F' in the column name text field
    5. Click 'Search'
     

If any items marked as uncompleted are found, a window will open up listing these out. You can then click (while holding down the CTRL key) on any of the items listed, and the program will open up the Worksheet containing that item (and all parent worksheets if they exist), and activate the cell containing this entry 'U'.

You can then complete the pricing of that item, and when finished move onto another item in the list, by CTRL+clicking on it. This list will remain open and 'on top' until closed, so you may need to move it aside while working, or close it. When the list has been closed, you will need to re-execute the search to recreate the list.

UnMarking Uncompleted Items


Unmarking an item is the simple process of deleteing the mark 'U'

Corollary

The process described above can be applied to any number of scenarios.

e.g. You may mark items with a Subcontractor code requiring prices to be entered later when provided

 A report will then be printed listing all the items which do not have a 'C' entered in the Flag column.

DISPLAYING COST CATEGORY BREAKDOWNS ON-SCREEN

Where desirable, Worksheets can be set up to dynamically display ALL or SOME of the Cost Category breakdowns on-screen at the Section Level and/or below.

Requirements

Every worksheet shown below must have a Column for each of the cost categories to be displayed  (Note: You do not need to have a column for ALL, only the ones in which you are interested):

Section Names
Cost
Rate (especially composites)

NOTE: If the CC breakdown is required only on the Summary Sheet, then you only need to do the following to the Section Names worksheet.

Setting up the Worksheet(s)

All that is required to achieve this is the columns displaying each of the Cost Categories need to have the following attributes:


Displaying/Hiding made Easy

All the columns displaying the 'CC' totals (if present) can be hidden/shown all at once by clicking the 'Hide CC Totals' in the Project Window as shown below:


The option toggles between show/hide each time it is clicked.

PROCESSING ACCOUNT CODES

Generally

This option is used to code the estimate into a set of account codes, and generate a file which can be used by external applications to set up the initial Project Budgets for Project Cost Monitoring.

The file generated either:
  • contains a series of line items in 'TAB separated value' format - '.txt'
  • is an Excel Workbook - '.xls'
    Each sheet in this workbook represents one of the Account Code
    Click the option 'Create an Excel Workbook....' to choose this file type

Each line in the file generated represents a cost item in the estimate, and contains the following fields:
  • Code of the source Estimate Section
  • Account Code
  • The Estimate Worksheet BQREF
  • Resource Code
  • Cost Category
  • Item DESCRIPTION
  • Item UNIT
  • Item QTY
  • Item RATE
  • Item COST
Coding

Coding is carried out by either using an existing column, or adding a special column (Account Code Column), to each of the worksheets within the project. This column MUST exist at each worksheet level if the report is to include a breakdown of each cost item at that level.  If subsheets do not include the Account Code column, then all items in that subsheet will maintain the Account Code of the parent worksheet item.

The Account Code of the parent worksheet item can be overridden in subsheets by entering a different Account Code in the nominated Account Code Column. If a subsheet contains an Account Code Column, but no Account Code, then the Account Code of the parent worksheet will be used.

Coding Requirements

All items must be coded at least at the Estimate Worksheet level.

Coding at the subsheet level is ONLY required for those items in the subsheet that have a different Account Code.

If an item is not coded at the Estimate Worksheet level, a report will be generated and displayed at the end of the Account Code collection phase. These offending items will be required to be coded before this bridging file can be created.

The Account Code can be anything as long as it is alphanumeric - the program does not check these codes against a lookup list for validity.

Incorrect Account Codes can be easily found using the 'Project->Search' for text option.

Generating the Account Code Bridging File
  1. Make sure that each Estimate Worksheet contains the column you will be using to code the items with
  2. Click the 'Edit->Account Codes' button.
  3. Click the Drop Down list on the right hand side and choose the column containing the Account code. The selected column will apear in the left hand text panel.
  4. Click the option 'Create an Excel Workbook...' to generate a file type '.xls' or leave unchecked for file type '.txt'
  5. When satisfied, click 'Use Selected' to proceed or 'Cancel' to abort.
  6. If an error report appears, correct the offending items and then start at step 1. again
  7. Done.
SECURING A PROJECT FROM ILLEGAL ACCESS

Projects can now be made 'SECURE' by allowing access to it by only those users of the 'Account Name' that created it.

Securing a project is achieved by ticking the  option 'Secure Project' in the Project Window adjacent the 'Backup on Close' option. If this option is ticked, this Project can only be opened by a user logged in with the same 'Account Name' as that which was active when this option was selected. NOTE: If you need to log in as TRIAL, then the project will not be available for opening.


OPENING VERSION 6 PROJECTS IN VERSION VJ:

Version 6 projects cannot be directly opened in Version 8 - they need to be converted.


It is very simply done by following this procedure:

UNLOCKING A PROJECT

This is a subject that is widely misunderstood.

There are two forms of ‘locks’ within VJ
1.     File Locking (multi-user access)
These locks are applied by VJ when various functions within a Project are executed.
e.g         Editing an Estimate Section, a Resource Library, the Section names, and Printing Reports
These locks are removed once the function has successfully completed, but will remain if the computer or software causes VJ to exit the function prematurely. Not even closing the Project or VJ and re-opening will remove the lock.

The other important consideration is that locks belong to the user. A lock generated by one user is different to a lock generated by a different user.
The only way of removing these locks is via the option ‘Projects->Unlock’ available in both the Project Window and the Program Window.

Clicking the unlock button in the ‘Projects’ window will only remove the user’s locks, and not other users locks. This prevents certain complications arising if one user deletes other users locks, and is the preferred unlock option.

Clicking the unlock button in the ‘Program’ window will remove ALL users locks and should only be used should the previous unlock option fail.
NOTE:    Make sure that there is nobody currently editing the Project, because when the file locks are removed, and somebody is currently working in a Worksheet, it would be possible for two people to be editing the same worksheet, the contents of which would end up as that being edited by the last person to exit that worksheet

2.    Project Edit Locking
This is a lock that is applied to the complete project, and simply stops users from modifying the data once the Project is locked. It doesn’t prevent them from opening the worksheets.
This lock is toggled between on and off, signified by a visual lock in locked or unlocked state, positioned in the top left corner of worksheet windows, and illustrated here:

COPYING SECTIONS

Complete Sections can be copied from one to another and from one project to another project if required.

  1. Select the source Section to be copied (only one at a time can be copied)
  2. Select the option 'Section->Copy'
  3. Select the destination Section
  4. Select the Option 'Section->Paste'
    NOTE: The destination section must be blank. If it already contains data, you must choose the option 'Section->Delete' first
Considerations when copying between Projects:
After the section has been copied, the program will recalculate the copied section and import any resources which do not exist in the destination Project. If you have the preferences for 'Confirm New Resources' turned ON, then it will Confirm importing of the new resources before accepting them.

If you use Project Variables in the Source section, and they are not defined in the Destination project, an error message will come up accordingly, and you will need to add this into the Destination project manually.

NOTE: Beware of any Project variables that conflict between the source and destination project. That is, you can possibly have the same Project variable defined in both source and destination projects but having a totally different impact.

EXPORTING COMPLETE SECTIONS

There is an option to make it more efficient to export a number of sections in the one operation. This involves selecting the Sections to be exported, then exporting them.

Selecting the Sections to be Exported:

In the Project Window, select the Sections to be exported by clicking on the first section, then while holding down the SHIFT key, press the down or up arrow until all the Sections you wish to export are highlighted. You do not have to highlight all the columns - as long as the rows containing the Sections to be exported have at least one column highlighted.

Now click the option 'Section->Export' in the Project Window, and choose where you want the clipfiles saved. The default location is the 'ClipFiles' folder in the Program Folder - in Windows this is 'C:\Program Files\JEstimator\ClipFiles', and on Macintosh and Linux this is '/Applications/JEstimator/ClipFiles'.

It is good policy, but not mandatory, to create a specific folder for each set of  these files.

The Progress Status window will now appear to signify the progress.

NOTE: The data in any workup sheets (QTY, RATE, COST) will not be included in the Export unless you hold down the ALT/Option key while clicking the Export button.

Exported Files
The Program will create a file called '<SectionName>.csv' for each section, where <SectionName> is the name entered in the 'Section Name' column in your Project Window.

The data is presented in these files in 'Comma Separated Value' (csv) format. This format is supported in all common computer programs as a means of data interchange.

RECALCULATING IN THE BACKGROUND

By Default, if any changes are made to Project details that impinge on the Project Cost - Resources, Currency definitions, etc - the Project needs to be recalculated.

In normal cases, this involves selecting the Recalculate Project option, then waiting for the process to complete.

You can choose, if you feel comfortable, to have the Project recalculate itself in the background while you are working. Thus when Printing is requested, you don't have to wait for the 'full monty', only and only if some sections still need to be completed.

This can be done by turning ON the appropriate option in the Preferences panel as shown below:


The Process:

VJ continually looks for which Worksheets need to be recalculated and recalculates them if needed.

If the Worksheet is in the process of being recalculated, and someone chooses to edit that Worksheet, the background recalculation will be terminated and the editing allowed to proceed. Under these circumstances, a warning will be given to wait.