WORKING WITH RESOURCES
Adding new resources into an Estimate is simply done by:
- Typing the RC (Resource
Code) into the RC column, then pressing the 'CTRL+' key
combination. A dialog will appear as below where the details
of the new resource can be entered

NOTE: The number of fields to be filled will depend on the columns that exist in the Project's Resource Library, and their properties.
- Exist in the local library
- Not be hidden
- Not be protected
- Not have a Formula
The same process takes place when you import data, either through Lookup Tables, Copy/Paste, Clipfile Imports, etc, into a Worksheet. All resources that exist in the imported data will automatically be added to the Resource Library if they don't exist. Note though, the details added to the Resource Library for each new resource, will be the details for the first occurrence of that new resource in the imported data.
If this Project maintains foreign currencies, AND the Preferences option 'Ignore Confirm New Resources' is OFF, then a Dialog will appear with appropriate fields already filled in (the CURR/N, and PURCH/P will be filled in with the defaults already). Make any changes then accept if appropriate.
Composite Resources
The same process is followed for Composite Resources as is for Simple Resources. The only difference is that with Composites, you will double click in the Rate column and build up the rate within a Rate Workup sheet.
Once this composite gets transferred to the local Library, the RATE workup sheet will be replaced with the literal rate value. Subsequent editing of the Rate workup will then have to be done from within the Resource Library.
USING RESOURCES
Generally
Using resources is only possible if the worksheet contains the 'RC' and 'CC' columns. These sheets are normally a RATE or COST worksheet.
When you open up one of these worksheets, the default view is:

The left panel shows the list of available resources, and the right panel is the RATE/COST worksheet details.
You 'call up' a resource by either:
- Double clicking on the resource you want in the left panel
(RC List Panel)
The chosen resource details will then fill out in the worksheet (right panel)
- Typing the RC in the RC column in the RATE/COST worksheet
As you type 'text' into the RC column, the left panel contents will be instantly abbreviated to show ONLY those resources that match the 'text' in either the RC or DESCRIPTION columns of the RC List Panel
On some computers, especially laptops, which have limited screen sizes, it is preferable to not show the RC List Panel at all times.
The option in System Preferences, displayed below, if ON will keep the RC LIst Panel 'closed' until you start typing into the RC column of the worksheet when it will automatically spring open displaying the resources. When you are finished typing or selecting the RC, the RC List Panel will automatically close.

RESOURCES FROM AN EXTERNAL LIBRARY
You can nominate another Project as being the source of Resource details (External Library) . That is, if you enter a Resource Code into the RC column of a worksheet, and that resource does not exist in the current Project, it will look for it in this External Library. If this External Library does contain this resource, the program will automatically import and add it into the current Project.
Furthermore, if you do not have the 'Defaults->Preferences->Do not confirm New Resources' option ticked, then each time a resource is imported from an external library, a dialog box will appear with the new Resources details, waiting for you to modify if desired and then click accept. Here is an example of this dialog:

As you can see, this is a Table of Columns, the columns being those that exist in the current Project's Resource Library, filled in with the data in the corresponding columns of the External Resource Library. You now can either press 'ENTER' to accept the details as presented, or press the 'TAB' key to activate the first and subsequent columns in this Table and make changes before accepting.
Choosing the External Library
When a Project is first created, it sets the 'External Library' pointer to itself.
Changing this pointer to another Project is achieved by opening a RATE/COST workup sheet, and then clicking the button just above the 'Local' and 'External' buttons in the Resource List Panel on the left as depicted below:
MODIFYING EXISTING RESOURCES
Once a resource has been created and used, you can use one of the three methods described below to change it's details:
-
Editing the Resource Library by clicking 'Library' in the Edit TAB, then editing the detail to be changed
-
Editing the resource details while in a Rate/Cost Worksheet
Note however you are not permitted to change the 'CC', UNIT, or 'RATE' fields of Composite resources via this method.
Editing the detail in this manner is achieved by:
- either
Pressing CTRL+ALT+DownArrow on the resource code in the Worksheet
OR
Right-click on the Resource code in the worksheet, and selecting the option 'Other->Edit Resource/Composite' from the popup menu
- Making the necessary modifications
- Clicking the ACCEPT button
-
- Editing/Viewing the build-up of a
composite
- Press CTRL+ALT+DownArrow on the 'resource code of the Composite to be edited/viewed
- edit the details for the composite in the Rate Workup sheet that is presented
- close the worksheet when finished
- bring the 'Project Window' to the front
- click on the 'Edit' TAB
- click the
 'Search' button
 - the following dialog appears:
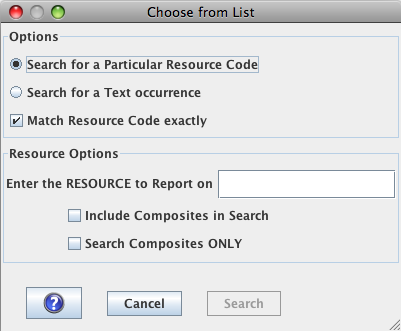
- click the option for '..Particular Resource..' or '...Text..'
- Enter the resource code OR the text phrase you are interested in
- If you are searching for a resource, Tick or UnTick the 'Match Resource code exactly'
- if you leave this option ticked, only resources with the Exact code will be listed
- if unticked, then any resource containing the search
phrase will be listed
- click 'Search'
- after a few seconds (depending on the size of the Project) a listing similar to the following appears:
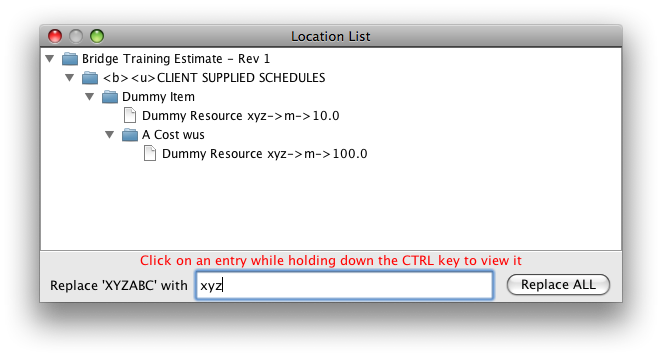
- this shows an expanded 'tree list' of the items found in the project. Each entry found is listed with the 'path through each worksheet' necessary to locate the entry. In the above example, this shows there are two entries in the Project for a resource 'XYZABC', and it is located in Section 'CLIENT SUPPLIED SCHEDULES' -> sub-item 'Dummy Item'
- CTRL+click on any entry, and the program will open
up all worksheets and sub-sheets necessary to locate
the entry. Furthermore, in each worksheet and
sub-sheet, the program will locate the entry for you
- bring the 'Project Window' to the front
- click on the 'Edit' TAB
- click the 'Search' button
- the following dialog appears:
- click the option for '..Particular Resource..'
- Enter the resource code you are interested in
- click 'Search'
- after a few seconds (depending on the size of the Project) a listing similar to the following appears:
- this shows an expanded 'tree list' of the items found in the project.
- now type in the new resource code to replace the existing
- click 'Replace ALL'
- clcik 'Yes' to confirm or 'No' to cancel the replacing process
- if you clicked 'Yes' to the previous confirmation, you
will be asked to change the Resource in the Library as
well
You should do this otherwise you will have resources in the estimate without them being specified in the Libary - a Message will come up when finished that ALL occurrences have been replaced
- Done
Generally
An 'unused' resource is defined as a resource which exists in the Library and/or in the Estimate body but without a quantity.
In most scenarios this is caused by not 'building up' the local Project Library, but rather starting off with a Library already present in the Template from which this project was copied, or by Copy/Paste into this project library from another project library.
The following steps can be used to remove all unused resources:
-
Edit the Resources
-
Click the 'Unused' button - all the unused resources will be placed below a line described as 'Unused Resources Follow'
-
Range and delete the lines containing these unused resources
-
Done
Sometimes
you may need to repeat this process again, as some resources
may have existed in Composites which have subsequently been
removed. Once all unused resources have been removed, a
message accordingly will appear.
Considerations
Where resources have been entered into the body of the estimate, but have no aggregated quantity, they will remain in the estimate but will have been removed from the Library.
Consequently the next time a Project->Recalculate is performed, these resources will be listed in an error report as not existing.
It may be a situation where they have been entered into the estimate but their quantity not measured. You can quickly verify this by 'finding' where they have been used through the 'Project->Search' option and investigating.
COST CATEGORIES:
Generally:
Cost
Categories (abbreviated as CC) are a coding system of two
letters which enables the program to break down the Total
Project Cost into up to seven different groups called Cost
Categories.
MA - Material (redefinable)
TM - Temporary Material (redefinable)
PE - Plant External (Hired) (redefinable)
PO - Plant Owned (redefinable)
SC - Subcontract (redefinable)
and Other (mandatory)
Reports with the options 'Detailed' and 'include
CC breakdowns' chosen will list in vertical columns, the cost of
each if included in either the resources used to price an item,
or directly entered into the 'CC' column of the priced items.
Any costs which have not got a CC definition will automatically
be added into the 'Other' column of the listing.
Clicking the 'MORE' button in the Project Window will provide a
dialog which enables you the user to redefine the default CC
codes and names for the project. NOTE: The LA - LABOUR cost
category is mandatory and cannot be changed.
Cost Category % Adjustments:
Each CC
(except OTHER) can have a % adjustment applied to it. This is
done by clicking the 'MORE' button in the Project Window and
entering the % in the appropriate text field. When reports with
the option 'Include Markups' ticked are printed, all prices for
items with CC's defined are marked up by the % stated.
SubCategories:
In
addition to breaking down the price into Cost Categories, each
Cost Category can be further subdivided into up to 6
SubCategories. Each of these SubCategories can have their own
%adjustment as well.
Define the Subcategories and their appropriate '% adjustment'
values by clicking the 'Define SubCategories' button in the
'MORE' options of the Project Window.
NOTE: You
must tick the option 'Use Subcategory Markups' if you want the
reports to use these markups - if not ticked, the program will
use the %Adjustments as defined against each of the Cost
Categories.
If ever you unwittingly remove resources from within the Resource Library that are contained within your Estimate, under certain scenarios you can restore them back into the Resource Library by following the steps outlined under each of the scenarios listed below.
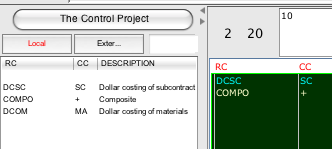
Scenario 1: You have been using an external library as their source
- Open one of the Rate/Cost workup sheets, and make sure that
the external library is selected
Here is an example of 'The Control Project' being selected
- If it is not selected, then click the appropriate button and
select it
If a missing resource is found, it will look in this external library for it and import it if it does exist - Select the option 'Project->Recalculate'
This will close any worksheets currently open and start the process - Click 'Recalculate'
This will Recalculate the project, importing any missing resources that exist in the selected external library
- Select the option 'Project->Recalculate'
- Click the button 'Automatically add non-existent resources'
- Click 'Recalculate'
This will Recalculate the project, adding into the Resource Library any missing resources
NOTE: Any composites that were created in a Rate/Cost workup sheet will be added into the library together with it's rate build up. Any composites created in the Resource Library will not be added as their will exist no detail of it's rate build-up.