
EstimatorVJ - A TUTORIAL
The following is a brief step by step tutorial on how to perform the basic functions in EstimatorVJ. More detail on each step can be obtained from the 'How Do I' Index of topics.
Your actions and keystrokes required in this tutorial are shown in RED.
TOPIC 1 - Creating a Project
- Start the Program and Log In
- Click the Projects->New button
- Select the 'Template' from which you wish to copy this Project.
- There are two default Templates provided - 'Standard' and 'EWS V5 Format'.
- You will find 'Standard' to be the most likely to suit your task
- Give the Project a 'NEW Project Jobcode'
- This may be a job number from a job register
- It may be the Project name (not title) listed on all drawings Keep it short, as this will improve access to it and it's data by the file system
- Do not use the Project Title - there is a place to state this once the project is created
- For the Tutorial, make the Job Code 'Tutorial Project'
- Click the 'Create' button
The Template selected will now be duplicated and placed in the 'Projects Folder' (Estdata8) and be renamed to your requested Job Code, it will then be Opened, and the Project Window displayed
TOPIC 2 - Preparing the Project for Work
Having created the Project, you now need to prepare it for working on. Remember that you used a Template to create this Project, so it will have 'default' information in this Project which now needs to be localized.
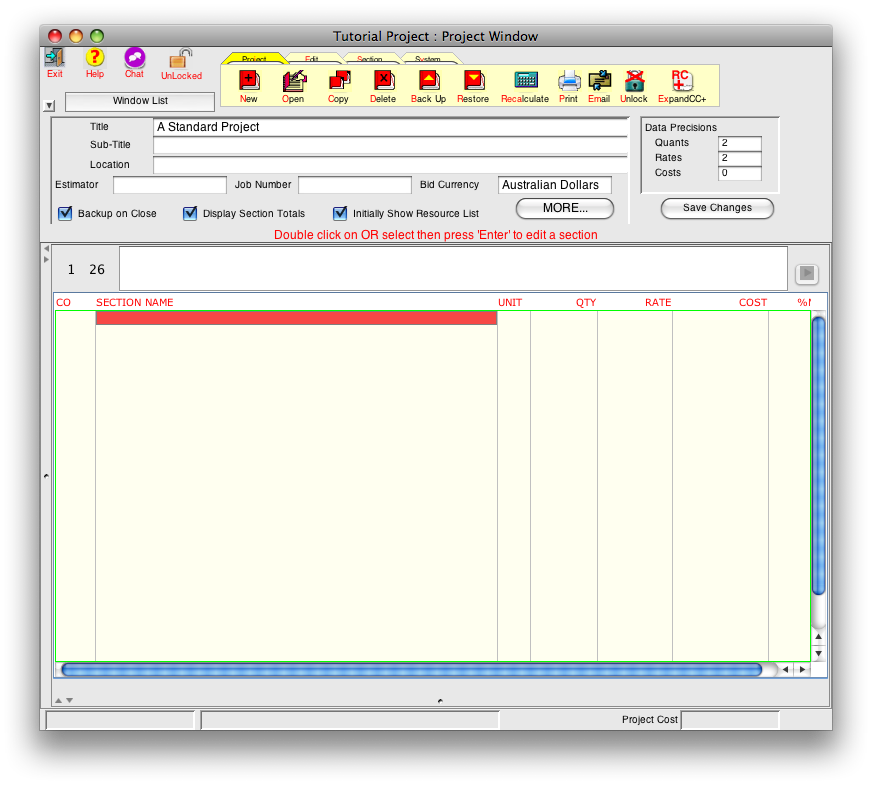
Here is the Project Window created when using the 'Standard' template:
You need to:
-
Fill in the project Details
-
Title = My Tutorial Project
-
Sub-title = Option A
-
Location = Big Ben, London
-
Estimator = John Smith
-
Job Number = 2009-249
-
Bid Currency = Australian Dollars
-
-
Enter the List of Sections this Project comprises
- Click the Edit->Section
Names button to put you into EDIT mode
- (you cannot edit the section name details until you are in 'Edit Mode'. In EDIT mode you will see a grid of faint lines, when not in EDIT mode these lines will not be visible).
- Enter the list of Sections you want the Project divided
into, one on each line in the 'Section Name' column
- (e.g. Concretor, Structural Steel, Roads, Switchboards, etc. )
- For this Tutorial, enter 'A Tutorial Section' then press 'TAB' on the first line. We will use this section for the next Topic.
- If you have already entered a section name on the first line, move onto it and press the 'CTRL+INS' key combination to make a space for it.
- Press the 'ESC'
key when finished entering the Section names
- (this will exit the EDIT mode and the grid lines will disappear)
Your Project Window should look something like this:

- Click the Edit->Section
Names button to put you into EDIT mode
-
You are now ready to work on this Project.
TOPIC 3 - Entering the BQ/ Schedule
In this topic we will enter and measure the quantities for a typical item - a concrete apron slab.
-
Double click on the line containing the section to edit ('A Tutorial Section')
- you must not be in EDIT mode, i.e. there must not be any grid lines showing, when double clicking to open an Estimate Worksheet
- this opens up the Estimate Worksheet and is associated with the corresponding line in the Section Names list (in this case 'A Tutorial Section)
- this is the window that is now displayed:
-
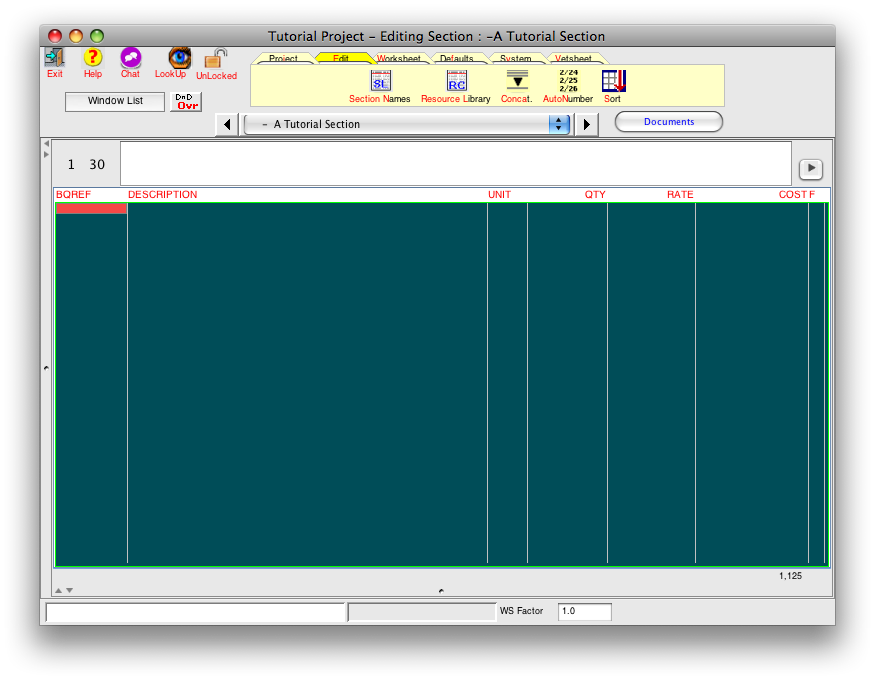
- Enter the details for our first item by:
- move if necesaary with your arrow keys to the BQREF column and typing '1.1'
- press the TAB key to exit 'the cell edit mode' and move to the next column
- type '20 Mpa concrete in 250 thick apron slab' into the DESCRIPTION column
- press the TAB key to exit 'the cell edit mode' and move to the next column
- type 'm3' in the UNIT column
- press the TAB key to exit 'the cell edit mode' and move to the next column
- we should now be sitting with the QTY cell selected. We are now
going to measure the quantities for this apron slab in what is
called a 'quantity workup sheet'
- double click in the QTY cell next to our UNIT 'm3'
- the following 'quantity workup sheet' appears
-
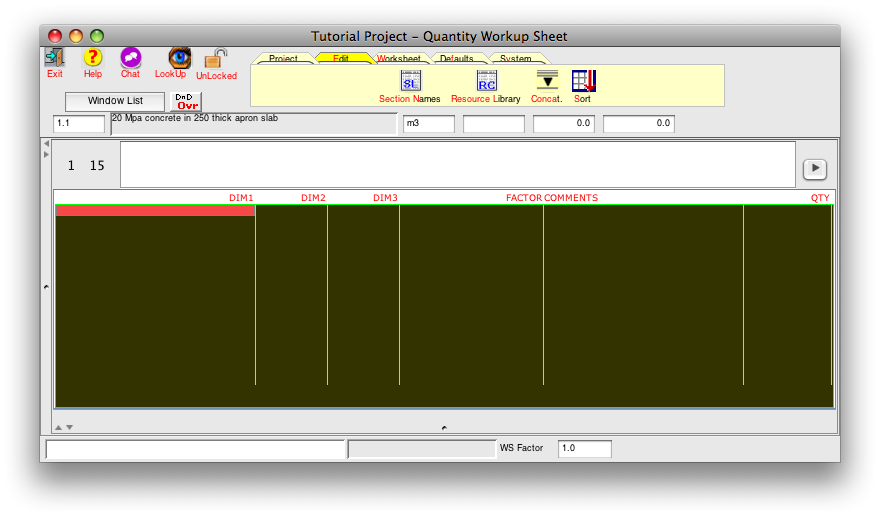
- assume we have 3 apron slabs:
- 2 slabs each 42.50m x 85.00, and
- 1 slab 23.56m x 45.67m
- type
- 42.50 in the DIM1 column and press TAB
- 85.00 in the DIM2 column and press TAB
- press TAB until the selected cell is in the FACTOR column then type in 2
- press ENTER
- you will now have the DIM1 cell on the next line selected, ready to enter the next slab dims
- type
- 23.56 TAB
- 45.67 TAB
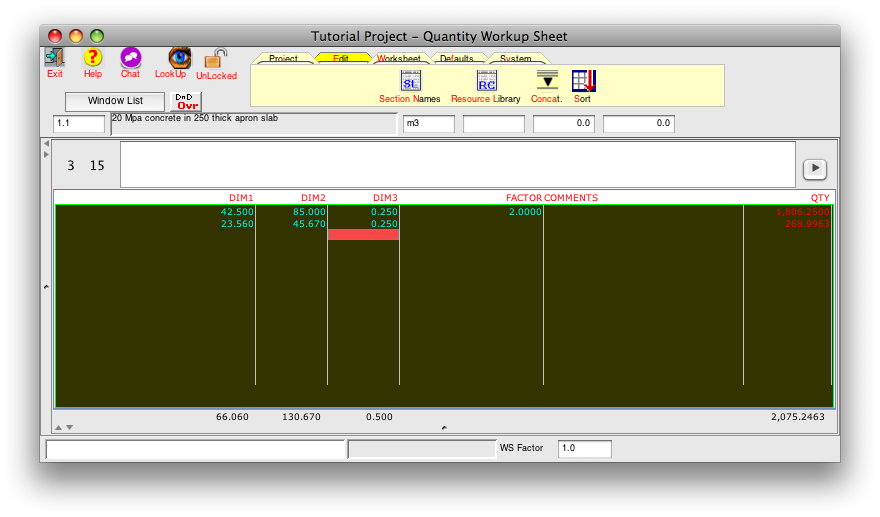
- notice that even though we have only entered two dimensions for each of our apron slabs, there is still displayed in the QTY column the totals for each line (i.e. the area in this case). It is important to understand that the program does not enforce NOR check what you have entered - it is purely a data capture process and throws the responsibility back to you as to the validity of the data you have entered
- we now need to enter the third (thickness dimension)
- use your arrow keys to move to the line containing the first apron slab dims and into the 'DIM3' column (if you get accustomed to using your keyboard rather than your mouse for most operations, you will perform operations more quickly and with less mental effort)
- type
- 0.25 and then the 'DOWN ARROW' key
- press the 'F11' function key (This function key is internally programmed to perform a copy of the previous non-blank cell)
- we have finished entering our dimensions - the worksheet should look like this
-
- if you have made a mistake and want to start again, move to the first line and press the 'CTRL+DEL' key combination to delete the current line, then repeat the data entry for this line
- OR
- press the RIGHT mouse button (CONTROL+mouse on the Macintosh) and select 'Remove Lines' from the menu selection and re-enter
TOPIC 4 - Editing in Workup Sheets
Here is a brief account of the basic editing features in a workup sheet. Please refer to the 'How Do I' help topic Keyboard Shortcuts for details on all keyboard shortcuts:
If you make a mistake at any time, Undo the mistake by pressing the 'CTRL+Z' key combination., OR press 'SHFT+CTRL+Z' to REDO just as in a Wordprocessor.
-
editing existing data
- move to the cell to be edited
- either
- start typing - you are put into 'data edit' mode and the text will be added to the end of the existing text
- press 'CTRL+DownArrow' keys - you are put into 'data edit' mode
- double click on the cell to edit - you are put into 'data edit' mode
- delete existing cell data
- move to the cell to be deleted
- press 'Del' or 'Backspace' key
- delete existing line
- move to the line to be deleted
- press 'CTRL+Del' key combination
-
insert a new line
- move to the line in front of which the new line is to be inserted
- press the 'CTRL+Ins' key combination
- close the current worksheet when finished
- press the 'ESC' key
TOPIC 5 - Pricing the BQ/Schedule
There are two ways of pricing the BQ/Schedule:
- Entering a rate or cost adjacent to the quantity for the item
- This is self expanatory and therefore will not be detailed. However, if you do price in this manner, there are a lot of functions within EstimatorVJ which will not available. These will be dealt with during explanation of the next method
- Building up a Rate/Cost workup sheet
- In this method, the rate/cost of the item is built up by
selecting from a Library of resources, the resources involved in
making up the cost. The advantage of this results from the fact
that each resource has it's details defined for it, such as it's
- Cost Category (Labour, Material, Plant, etc),
- Description
- Unit of Measure
- Rate
- There are also numerous reports which can be gleaned from such an approach.
- Most important of all though, is the fact that your estimate can be controlled from this central project library by changing each resources' rate and recalculating the project.
- In this method, the rate/cost of the item is built up by
selecting from a Library of resources, the resources involved in
making up the cost. The advantage of this results from the fact
that each resource has it's details defined for it, such as it's
Let's now price the item in our Tutorial Project - apron slab - using resources.
If you still have the Quantity Workup Sheet still open, close it by hitting the 'ESC' key while it's window is active.
Activate or open the Estimate Worksheet for the 'A Tutorial Section', and:
- select (use your arrow keys until the appropriate cell is highlighted) the cell in the 'COST' column adjacent to this item and press the CTRL+DownArrow
- you will be presented with the Cost workup sheet - similar to the worksheets we have already been using, but with different columns performing the functions inferred by the column name
- this is what it looks like:
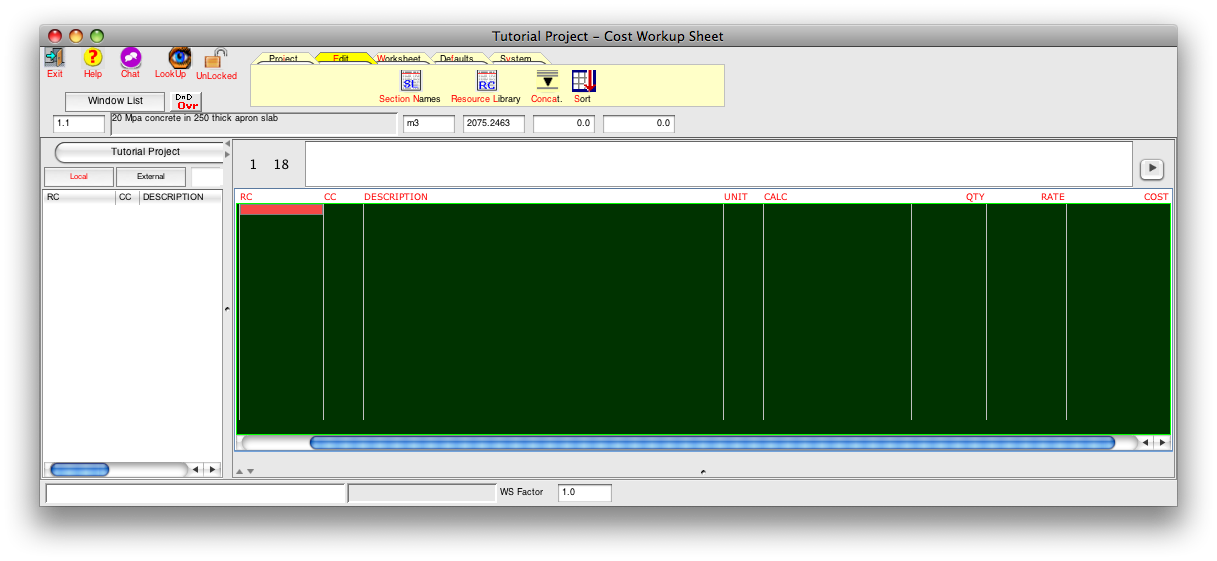
- we are now going to use three resources (keeping it simple) to
price this item
- concrete
- concretor
- concrete pump truck
- since this is the first time we have created a project, we do not have a previous project in which we can recall these resources, so we need to create them from scratch.
- enter the following details for our first resource:
- RC column = 'CO30'
- CC = 'MA'
- DESCRIPTION = '30 Mpa concrete supply incl delivery to site'
- UNIT = 'm3'
- RATE = 160.00
- important to understand here, that these details only exist at the moment in this cost workup sheet. This resource does not exist in the project resource library as it has not yet been entered into it. What has happened here is that when we entered the RC = 'CO30', the program in normal circumstances, would look for this code in our project library, get it's details from that library, and enter them automatically into each respective column. Since this resource does not currently exist, it leaves whatever we type in for it. When we close this worksheet, the program will check to see if there are any new resources, and if so, automatically add them in to the project library.
- close this worksheet now by hitting the ESC key
- open the COST workup sheet again by pressing CTRL+DownArrow
- look in the list in the left panel - you will now see the CO30 resource we entered previously - this panel is called the RC Selection List, and is shown to the left of all worksheets continaing an RC column
- we will now delete this current resource, and re-enter it again, this time by selecting it from our RC List panel
- select this resource by:
- move to the line currently holding the 'CO30' resource and press CTRL+Del to remove it
- activate the RC Selection List by pressing the CTRL+LeftArrow key
- select the CO30 resource using your arrow keys, then press 'Enter' to select it
- it's details have now been entered into our cost workup sheet for us - NOTE we still have the RC List Panel active so we can continually move to and 'select' other resources we may need. When all the necessary resources have been imported into our Cost workup sheet, we activate (move back to) our cost workup sheet by pressing the CTRL+RightArrow key.
- if you haven't already done so, press the CTRL+RightArrow to activate our cost worksheet
- move to the 'CALC' column
- we are going to enter the amount of concrete we need for this
item
- remember we are building up a COST and not a RATE for this item, so our quants must be based on the item's qty - this is shown in the 'Parent Item's Detail Block' sitting just below the options button panel, as depicted below:

- enter the following
into the 'CALC' cell
- '2076m3 *
1.1wste'
- notice that we have text in here, referred to as
'annotation' - this is allowed by following these
guidelines
- the number must be placed first, followed by the annotation
- the annotation must not contain any arithmetic characters - '()^*/+-|@&%$[]'
- notice that we have text in here, referred to as
'annotation' - this is allowed by following these
guidelines
- '2076m3 *
1.1wste'
- press 'Enter' to exit 'edit mode' and you will notice that the program multiplies the rate by the resulting qty and places the answer in the cost column
- now enter the details for
the other two resources:
- labour
- RC = COLAB
- CC = LA
- DESCRIPTION = Concrete labourer
- RATE = 45.00
- concrete pump
- RC = COPUMP
- CC = PE
- DESCRIPTION = Concrete pump hire and pump
- RATE = 2.25
- labour
- now enter the respective 'CALC's for each, remembering to represent them as a product of the item's qty
- when you have finished, the worksheet should look something like this:

- press the ESC key to close this worksheet and return you to the Estimate Worksheet
- we are now going to use three resources (keeping it simple) to
price this item
- the rate will automatically be calculated for you and placed in the RATE column
- the same process involves pricing in a RATE workup sheet, the only difference being that the CALCS represent 1 unit
Topic 6 : PRINTING
There are too many variations of reports in Estimator VJ to detail each one. It is advised to try each one to familiarize yourself.
There is one report however which should ALWAYS BE RUN before committing costs. This report is an Estimate Summary-Detailed-Include Markups and Distributions.
The three columns to check the total for are:
COST Should match the Project Cost on-screenIf they are incorrect, then the Estimate should be checked for accuracies.
ASSIGNED Should be zero
O/HEADS Should be zero
Here is an Example printout:
