
Every worksheet has a Structure comprising the following attributes:
Resource Library
Estimate Section
Quantity Workup
Rate Workup
Cost Workup
Query Sheet
Window Position on screen
Font
Font Name
Font Size
Font Style (bold,italic,underline)
Background Colour
Foreground Colour
Selected Colour
The 'Value' Column
'Value' Column background colour
Columns
This attribute cannot be changed - it is set automatically when you open up an existing or create a new worksheet. The worksheet type is determined by what action you take to create it.
e.g. If you double click on a Section Name in the Project Window, you create an 'Estimate Section' worksheet.
This is set when the worksheet is closed after editing.
Font/Background/Foreground Colour
This is set by clicking the option 'Defaults->Edit Colours/Fonts'
Columns
Each column has it's own set of attributes, and these will be dealt with in detail below.
The VALUE Column
Every column in every Worksheet has it's own set of attributes stored within that worksheet. Consequently, two worksheets of the same type can have columns with identical names but with different attributes.
The following is a list of all the attributes:
Formula (a series of expressions and operators)
Cost
Date
Hidden
Protected
Printable
Receives Overhead Spread
Rate
Cost
None (workup sheets not allowed within this column)
Rate (when selected equals that which is defined in the Project defaults)
Cost (when selected equals that which is defined in the Project defaults)
Other (dec places specifically defined)
Enable Rounding (if this is ticked ON, then calculations involving this column will use the ROUNDED value to the number of decimal places specified by the precision setting, if OFF then calculations will use the EXACT value to six decimal places
Round Up (rounds the number up to the next precision)
Right
Centre
Justified
Overtype
Replace
Disable wrap
Upper Case
You can modify the structure of an existing worksheet in two different ways:
Right clicking on the Column Heading, and selecting which attribute to change
Method 1 - Modify Structure Option
There are a number of PRIME columns in each worksheet type - BQRef, Description, Section Name, Unit, Qty, Rate, and Cost. Various Reports and functions within EstimatorVJ access the data in these columns through their names. Consequently it is not advisable to modify these columns in any way without fully testing the ramifications of doing so - in particular their names and formula.
Here is the dialog you are presented with when choosing this option:
- with 'General' TAB selected


- Click the left and right arrows to bring up the 'title' of the column you want to modify
- Click the General or Data tab to bring up the set of options desired
- Click the appropriates options to change or enter the appropriate information
- Click Finish when done
- NOTE:These changes affect only this worksheet. If you want to apply these changes to other worksheets, you need to click the 'Defaults->Apply Settings' option described below
- Click the 'Set As Default' button if you want these settings
to apply to all NEW worksheets
of this type
NOTE: Remove any unwanted data first as any data in this worksheet will also be saved. - Close the worksheet to make the modifications permanent
A Column is locked when the lock button (shown below) is red. ˆn this state, only Account Managers can modify this column's attributes, or delete it, or use it for adding new columns. Clicking the lock button will toggle it between locked and unlocked.

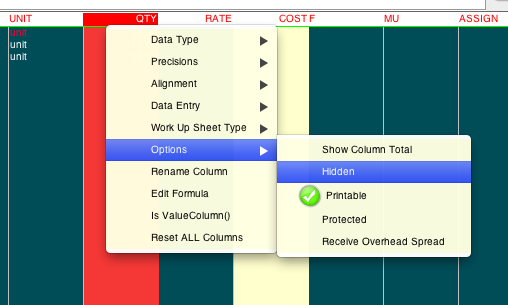
You can hide columns from view, by Right-clicking in the heading of the column to be hidden, and then ticking the column attribute 'Hidden' as illustrated:
- Selecting the option 'Defaults->Modify Structure'
- Use the Left/Right arrows so select the currently Hidden column
- Unticking the 'Hidden' attribute
This is done by:
- Right clicking anywhere in the Columns heading
- Selecting the option 'Reset ALL Columns'
When a Project Password has been provided, the 'Modify' tag can be turned OFF (no tick in the checkbox). Any subsequent attempt to modify the structure of a worksheet is denied until the tag is turned ON (a tick in the checkbox).
The 'Modify' flag can only be modified after providing the Project Password.
- Open an existing worksheet that you want to use as the 'Prototype' of the desired structure
- Make the appropriate modifications
- Choose the option 'Defaults->Apply Settings'
- The following dialog appears:

- Specify which columns are involved in the changes
- Click the option 'A Specific Column' and choose the column from the 'Name' list to specify as the 'target' of the attributes, if you only want the attributes for a particular column to be changed in the target worksheets
- Click the option 'Add Column if it doesn't exist' and if the target worksheet doesn't contain this column, then it will be appended to the end of the columns
- Click the 'Delete Column' to delete the specified column
- Click 'Rename to', and enter the name required for the
specified column, and all matching columns will be
renamed
- Click the option 'All Columns Matching.....' if you
want all matching columns in the target worksheets to be
changed to the attributes of all matching Columns
in this source worksheet
- Specify which worksheets are involved in the changes
- Click the option 'Children of this Estimate Worksheet' to change the target columns only in this Estimate Worksheet
- Click the option 'Children of this Worksheet's Parent'
to change the target columns of all child worksheets
contained in this worksheet's parent Worksheet
This option would normally be used when applying changes to Rate/Cost workup sheets in the Resource Library.
Edit the resource Library, open one the Rate/Cost workup sheets you want to use as the prototype, then select the 'Apply Settings' option and tick the 'Children of this Worksheet's Parent' option. - Click the option 'All Worksheets of this Type' to change the target columns in all worksheets of this type in this Project
- Click the option 'All Project Worksheets' to change the target columns in all worksheets in this Project
- Click 'ON' the 'Allign Columns' option to order the
columns in the destination worksheets to the same order in
the source worksheet
NOTE: This will only work if there is a one-to-one correspondence between the source and destination worksheet column names.
- Click 'Go' to execute your selections
There is an option provided to DELETE columns matching in NAME from ALL Worksheets of a particular type.
e.g. You could delete ALL 'BQREF' columns from ALL Estimate Worksheets using this option.
Warning: There is no undo on this option, so make sure you do a Project Backup first.
- Open one of the worksheets from which you want to delete the column
- Click in one of the
cells in the column you want to delete
- Choose the option 'Modify Structure' in the 'Defaults' TAB
- The following dialog
appears

- Make sure that the Title text box is showing the Column heading you want to delete
- While holding down
the ALT key click the
 key
key - Confirm that you '...
are sure' and the program will carry out the Deletion
The following applies to the parent Estimate Worksheets, Schedules, and Resource Library Worksheet. Rate, Quantity, and Cost workup sheets are 'children' of either the Resource Library or Estimate Worksheet, and are therefore included with their parent.
While you work in a worksheet, the program creates a 'Timed' backup of the worksheet at the intervals specified in your 'System->Preferences' (Note that these are a different type of backup to PROJECT backups as they only backup the current worksheet) as well as a 'Standard' backup when the worksheet is closed. Consequently, if you have been working in a worksheet for a period longer than the 'worksheet backup interval', then a 'Timed' backup will be created. When you close the worksheet, another backup (a 'Normal' backup) will be created and will be the same as the worksheet data file.
'Timed' backups are stored in the 'TimedBackup' folder under a Subfolder of the same name as the Worksheet File (e.g. 'My Project Name.b11' for Estimate Worksheets, and 'My Project Name.Resources' for the Resource Library Worksheet). The names of the actual backup files will be of the form:
- yy = year
- MM = month
- dd = day
- HH = hour (24 hour clock)
- mm = minute of the
hour
representing the exact time the backup was taken
e.g. 09-09-29-12-45
'Normal' backups are stored in the 'Backup' folder contained in the Project folder, and have the same file name as the original. Only one of these per Worksheet are maintained.
Whenever a worksheet is opened, the 'Normal' backup and original data files are compared using the 'Last Modified Date' setting of each file. If the 'Normal' backup is more recent than the original, then the program presumes that there was a system/program crash during the editing phase of a worksheet resulting in the latest changes not being saved. In these circumstances, the program will notify the user accordingly, and confirm that the backup is to be restored.
Reverting to a Previous Backup
Restoring a backup means replacing the original data file with the contents of the Backup file, and is achieved in one of two ways:
- Automatically
by the program when it goes to open a worksheet that has
a backup with a more recent 'last modified date'.
The user is prompted to confirm whether this is to be carried out or not. - Selecting
the option 'Worksheet->Revert'
In this scenario, the program will bring up a 'File Chooser' dialog requesting you to choose the 'Timed' Backup file to be reverted back to. Having chosen the Backup , the program will close the current worksheet, and the Project in case of reverting the Resource Library, copy the chosen Backup over the current Worksheet file, then open the Worksheet again. The time at which the last backup was done is dependent on the setting 'Do TIMED backup of worksheets every nn minutes' in your 'System->Preferences'.
MODIFYING
WORKSHEET STRUCTURES PROJECT WIDE
THIS METHOD IS PRIMARILY USED TO MODIFY THE DEFAULT
AND ALL EXISTING WORKSHEETS OF A PARTICULAR
'WS TYPE'.
Unlike the method above for an individual worksheet, this
process is started at the Project Window by clicking the  button, and is used to change the Worksheet settings PROJECT
WIDE.
button, and is used to change the Worksheet settings PROJECT
WIDE.
A Dialog similar to the following appears:

Generally
The Dialog comprises three main panels:
- WS Default
This is where you choose which Default worksheet you will be using as the CONTROL (source) worksheet. The Default worksheet settings are those that are applied to ALL existing worksheets of the same type in this Project. - Modify WS Settings
This panel is used to change the following settings at the worksheet level (column attributes are not affected): - Window Frame:
- Size
- Location on screen
- Left panel divider location
- Worksheet Colours
- Background
- Foreground
- Gridlines
- Workup Sheet cell background
- Column Allignment (position of each column existing in both Default and existing worksheets)
- Modify Column Settings
This panel is used to change the column attributes/flags: - Width
- Wrap
- Totalling
- Uppercase
- Type
- Text
- Number
- Boolean
- Precision where applicable
- Round/Round Up
- Decimal point
- Allow Spaces
- Show comma separator in numbers
- Hidden
- Protected
- Printable
- Formula
Select the 'WS Type', and the attributes of all the columns in the corresponding Default worksheet will be loaded.
Now set each of the attributes as desired, and when satisfied, click the 'Apply' button.
NOTE: If you select a different 'WS Type' before clicking the 'Apply' button, then any changes made will be lost.
When you click the 'Apply' button, the attributes of ALL the columns will be saved for the Default worksheet of the selected 'WS Type', and applied to ALL existing worksheets in the Project of that 'WS Type'.
How to Add a Column:
Select the 'WS Type' to which you want to add the column.
Select the column in the 'Which Column' list that has the most appropriate column attributes.
Tick the 'Add' button, and enter the name of the column to be added in the text box appearing next to the 'Add' button.
Change any column attributes applicable for the new column.
Click 'Apply' and the Default worksheet and ALL appropriate existing worksheets in the Project will have the column added at the end if not already existing.
How to Delete a Column:
Select the 'WS Type' and the column in the 'Which Column' list that you want deleted.
Tick the 'Delete' button.
Click 'Apply' and the Default worksheet and ALL appropriate existing worksheets in the Project will have the column deleted if it exists.
Considerations:
The above changes are permanent and cannot be undone. If you make a mistake you will need to manually reverse what you changed.
How to Change the WS Settings
- Select the WS Default you want to modify
- Click the 'Edit Default' button
The corresponding worksheet will be presented for modifying. - Modify:
- The size and location of the worksheet
- The colours and font
- The divider location of the left panel
- The widths of each column
- The position of each column
- Close the worksheet
- Tick the options you want applied
- dimensions
- colours
- allignment of columns
- Click the 'Apply' button in the 'Modify WS Settings' panel
